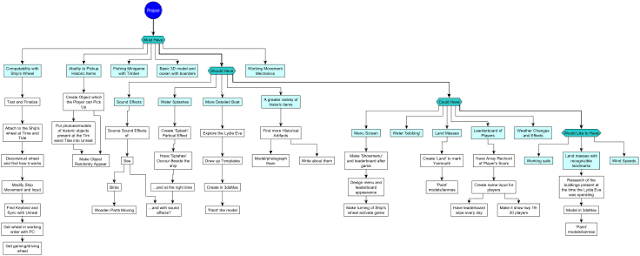
Examining Options at the Time and Tide
As part of the Level Four, it was given that we were to take part in some contract work for a real company, in order to get some active experience in the industry in the form of a commission which would, hopefully, be published and used en mass.
This deal was made with the Time and Tide in Great Yarmouth. The Time and Tide were looking for a number of small computer games they could put inside their museum to help keep peoples’ interest and to draw their attention to a higher level towards the other artifacts in the room. This started off with an informative meeting with them at the Time and Tide, to which all of the students taking the Level Four attended.
The initial talk with our contractors was for them to impart the various briefs they were looking for us to make. While they were open to ideas, they also gave advice on the things they were not willing for us to make, such as games with content that was historically inaccurate, was unacceptable for viewers of particular ages or things that might put them or their sponsor in a bad light.
After this, we were taken out to the Edwardian house to see the Conspiracy Room therein. The Conspiracy Room is believed by some locals and historians to be the place where Oliver Cromwell and his supporters first talked about and arranged the English Civil War against King Charles I.
The game brief the Time and Tide related to was something that could involve the player exploring the Edwardian House and uncovering its secrets and connections with Oliver Cromwell — a historic mystery game that would encourage the player to look more closely and think deeper about the artifacts around them.
Then we went to the Central Yarmouth Library for a cup of tea or coffee.
After that, we were taken into the Toll House, which was partly bombed during the Second World War. That partly bombed part was then turned into the Central Yarmouth Library, where we had refreshments in.
We looked around at the area, at the prison cells, the court room and the side room where the prisoners would’ve been kept in. There were a large number of displays of historical items, some of which had a direct story behind them in the form of a crime they had been involved in.
The game brief the Time and Tide had made for this location was some kind of crime-and-punishment simulator, where the player could listen to the pleas and arguments of a number of accused suspected criminals, and to judge whether they were innocent or guilty, and to choose what level of punishment they required if they found them to be the latter of the two.
Also, they suggested we could do something with the prison cell beneath.
They also told us there was going to be a special exhibition at the Time and Tide for a few weeks regarding Medieval Medicine, where a player would have to examine a patient, treat their wounds and bring them back to health if possible by means of traditional methods.
After that, we then were taken back to the Time and Tide Maritime museum itself and were allowed to look around the exhibitions there. We were shown to a number of points of interest, but the one which they specifically wanted us to see was an in-house replica of a part of the Lydia Eva (a steam drifter, one of the last of its kind in the country), with a ship’s wheel, radio, speed control lever, a few other decorative and boat-related items and a large screen set in the centre of it, showing the front end of a ship (the bow).
The items were arranged in line with one another to replicate an environment of a boat and was relatively immersive of that environment. However, the 3D render of the boat at sea was outdated, the wheel was locked in place and children (and adults) were frequently seen going up to the boat with excitement, trying to turn the wheel, only to leave with disappointment.
The brief for this area, then, was to create a game that could use this already existing environment for fishing, exploration or otherwise Maritime-related activities. Our group then returned to the room we started in and were asked to move into groups of what they were interested in doing.
I judged that, for me, the best project to be involved with was the fishing/boat game, for several reasons. Firstly, the core concept was so simple that it would be hard to mess up (a prototype of the game could be finished in a matter of weeks and then refined for the rest of the time); second, because it would likely be played the most by children (who would flock towards it upon seeing it); it would be there and be continuously maintained for the longest time (unlike Medieval Medicine, which was only a temporary exhibition); and, because I wanted to explore the immersive side of the creation of it, and the uniqueness of the problems involved.
Beginning Work
Essentially, this gave us a template game with a workable boat in just a few hours of work. The largest failing of this is the way in which the boat moved, however. It was clear by the steering that this boat was just a car, as it would ‘spin out’ and ‘drift’ like a car on a road, and was able to perform maneuvers a boat would not be able to.
Yet it was able to fulfill its function in giving us a working start, on which the other mechanics of the game could be created and tested.
I created an enclosed area in which the boat (car) could sail (drive) into. This area had a volume in it which sets a variable called ‘Can Fish’ to true, activating the ability to press ‘E’ to drop the net and start fishing. Doing so would then allow any ‘Fish’ that were driven over to be collected (destroys actor on collision and adds one to ‘fish caught’ variable displayed on the HUD), and starts a short timer which sets ‘Can Fish’ to false again when it runs out.
While this works well enough for the alpha, its main issue is that the current programming only allows this to happen once; after that, the programming would not allow a second bout of fishing to be done (it is currently set to only allow this to happen once, so one player can’t re-fish the same area endlessly).
Also, while fish are ‘collected’, they are treated the same as coins in Mario, and not like fish being caught by a trawling vessel. Better game mechanics will have to be envisioned and created before it will be ready to publish.
7th of January, the Start of 2019
On the seventh of January, I, with some other students in my class, went on a secondary trip to the Time and Tide. We were met by Tricia Hall, who welcomed us and explained when the Elizabethan House Museum and the Toll House would be open. At that time, I was the only person working on the fishing game present — most of the others were interested in seeing the other locations which were closed at that time — and so Tricia led me down to the Time and Tide’s boat cabin reproduction of the Lydia Eva.
She asked me how we’d been getting on with the fishing game, and I explained to her the project had been going well so far, informing her that the function was to simulate the traditional trawling techniques of the Lydia Eva and that, in the process of catching fish, one might also pick up items of historical interest of artifacts that are present in the Time and Tide museum itself.
She seemed pleased with what she’d heard, and we talked for a while about how finding the artifacts would make it “Not just about drawing the player into the game, but taking their interest to the rest of the museum.” She also mentioned it might be an idea to have only artifacts that were within a short distance of the Lydia Eva display, to prevent people from having to walk across the length of the museum to see what they had caught.
In the process of talking about the various things which could make appearances in the game, we talked about the (typically Scottish) fishwives who would gut and prepare the caught fish. She was enthusiastic about it, saying it was only a small display but a very important one. Perhaps having additional information on fishwives on the screen at times would be of interest.
After talking about the objects available, I spotted a radio device in the same area as the Lydia Eva reproduction. It appeared to be decorative only, and the screen covering the radio was not the original, but a plastic cover with the words “All that comes to the net is fish.” written upon it.
I then had the idea if it would be possible to use that as a map for the player to navigate. If we were allowed to open the top of the radio, a small tablet could be slipped inside and designed to show a basic map which the boat would appear on.
I asked Tricia if this would be possible. She wasn’t sure, but agreed that it would draw in the scene and the immersion even more, and made a note to ask whoever needed asking for permission.
The rest of our time at the Time and Tide involved looking at and photographing the artifacts present, and taking down information for use in the game.

The most important thing is getting the ship’s wheel to work with the Unreal Engine. This also requires custom movements to be created; ones which are more realistic than the car can provide. This still breaks down to the same movements as a car (or person) running on a solid floor, as the model of the person can be replaced with that of a boat, and a texture for water can be added to underneath.
After experimenting for a while, trying to get the PS2 (or other platform’s) driving wheel (USB connected) to talk to the Unreal Engine system properly, I found it difficult to properly utilize it, given the large number of possible ‘inputs’ and with no way of checking which related to the wheel itself.
To make a semi-working version that used the wheel, I used a program called ‘JoyToKey’ which allowed the input of the wheel to be given a keybind. In this instance, I used the keys ‘Q’ and ‘E’.

In the Unreal Engine, I then went to the Player Character Blueprint (of a newly made First Person game mode), and created a boolean variable called ‘Moving’, which would be set to ‘True’ if the character was moving forwards or backwards, and ‘False’ if they stopped.
If Q or E were pressed, it would check to see if ‘Moving’ was true, and then the ‘Add Controller Yaw Input’ with a low value, meaning that when Q or E were pressed (so long as the character was moving forwards), it would rotate the character a small amount left or right (Q for left; E for right).
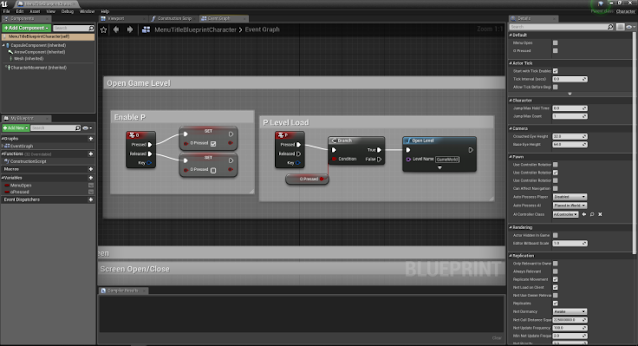
In JoyToKey, the Q or E instruction was then set to repeat thirty times a second, so turning the wheel left for half a second would write ‘qqqqqqqqqqqqq’. These Qs, in Unreal, then mean that the Yaw node, to ‘rotate left’, was triggered to slightly rotate the character left, doing such thirty times a second by a small enough amount to make it fairly fluid in its motion.
This, however, would not work for the final product, as turning the wheel either direction by 5% would have the same impact as turning it by 80% (there’s no increase in turning speed for how much your turn).
Admin Screen
Furthering the design of the game via the next steps presented in the Gantt chart is, at this moment, not an easy thing to do. We will acquire a better ‘gaming wheel’ to create the mechanics with; the better-modeled 3D ship is under Sam’s regime, the sound effects (which I have now acquired from a Creative Commons licensed website, freesound.org) I cannot edit together as there is no audio editing software on these computers; and so the next thing of importance, I decided to do, was to make an admin screen, which would be accessible only by the people at Time and Tide.
A password would be impractical (as they’d have to all know it and pass it on to all staff) and unnecessary, as it could rely on just plugging a keyboard in and pressing the ‘ESC’ key (as the Time and Tide fishing project itself would not have a keyboard attached).
I created the menu screen in GIMP and made different appearances for the buttons for when they were on, off and hovered over. However, this would mean the people using it would also have to plug in a mouse, thus, making it slightly less convenient, since the keyboard keys are only needed for the admins themselves. It would be simpler and no less effective to just have the admin screen always active with the ability to toggle its visibility with the ESC key and have various keys set to do particular functions, meaning there was no need for a ‘hover’ and ‘pressed’.
If the instructions were to say things such as ‘Shutdown Game > S key’, ‘Restart Game > R key’ and ‘Edit leader-board > E key’, then the menu would still be effective, and because normal players won’t have access to keys, it doesn’t matter if they’re bound to something, as there’s no risk of them accidentally pressing it.
I then returned to GIMP and created some new menu screens…
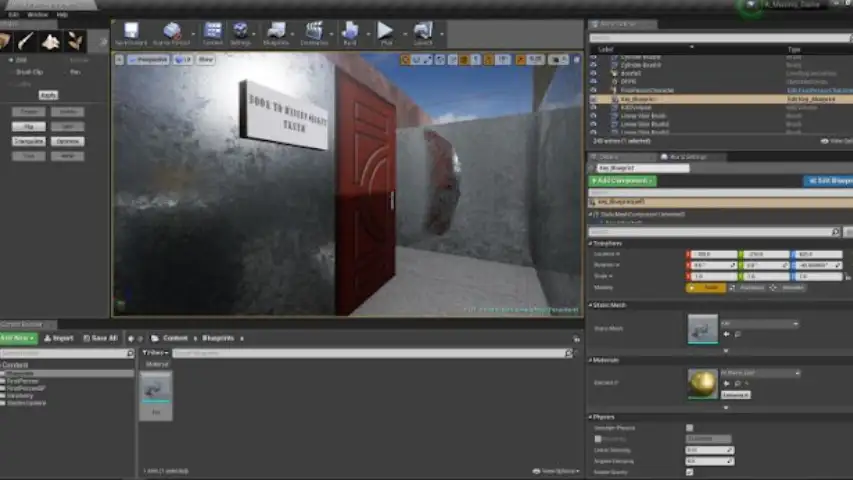
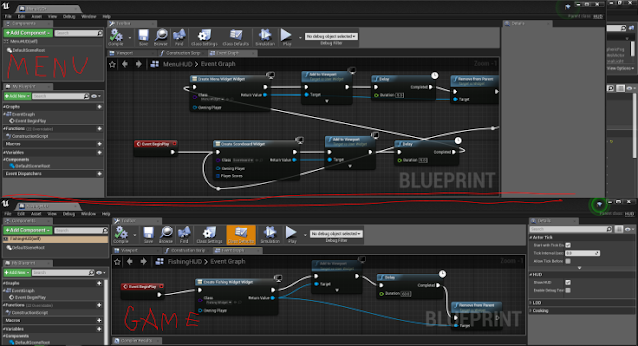
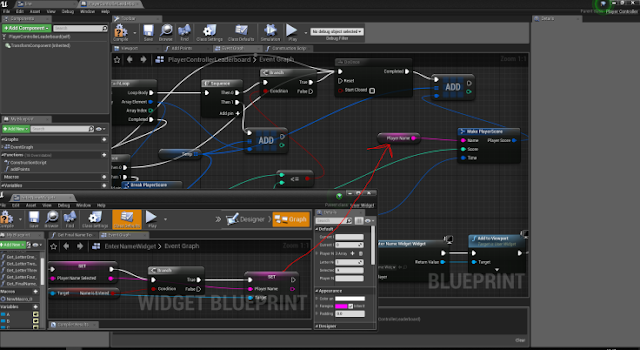
These were then imported into UE4. I created Widgets, Blueprints and HUDs for both levels. I created a Game folder for the game itself, and a Menu folder for the title sequence. I added a further Admin folder in the game folder to which I added the admin screen information above. I created a widget in this called ‘AdminWidget’ and set that up with the images I’d made in the right locations.

In the Game folder, I right-clicked and created a User Interface > Widget Blueprint, which I called ‘FishingWidget’, which is what would display the timer and number of caught fish once these mechanics were active.
I right-clicked and created a “Level”, which I called ‘GameWorld’, and this would be where the game itself would take place. I created “Blueprint Class > Character”, which I called ‘LydiaEva’ as this was to be the player character and the object the player would control. “Blueprint Class > HUD” was created so the game could be programmed with a default widget.
“Blueprint Class > Game Mode Base” was created and called ‘FishingGamemode’, and this is what would tell the game to display the GameWidget. Under the LydiaEva character screen, a function to display the ‘Admin Screen’ was added with a “On click ‘ENTER’, ‘Create Widget’ > ‘AdminWidget’, ‘Add to Viewport'”. It also came with a flip-flop which would alternate it between adding and removing the Widget from the view port, and to set a variable, ‘menuOpen’ which would be set to true or false if the Admin screen was open or closed, and allow or disallow the other keys to do anything.

The ‘World Settings > Game Mode Override’ was set to ‘FishingGamemode’ so the level would know what world settings it had to look at. The settings in the Fishing Gamemode were then looked at, and the ‘Default Pawn Class’ (the thing the game takes to be the ‘player’) was set to ‘LydiaEva’, and the HUD Class was set to ‘FishingHUD’, (so the game then also would know what information to print to the screen).
Under the Lydia Eva player character blueprint, I added an instruction whereby pressing ‘Enter’ would turn the admin screen on and off, using a FlipFlop to alternate between ‘Setting menuOpen as true’, ‘ creating admin widget’ and ‘adding to viewport’ between ‘Setting menuOpen as false’ and ‘Removing it from parent’. All this would do would be to make a screen with some instructions on it to appear and disappear, but the setting ‘True’ of the ‘menuOpen’ variable would allow further inputs to happen.
The keys ‘S’, ‘D’ and ‘F’ are all bound to perform functions of their own. However, these are only allowed to fire if ‘menuOpen’ is true. This way, the ‘S’ key’s instruction to ‘Quit Game’ and the ‘F’ key’s instruction to ‘Open Level > GameWorld’ are not allowed if the menu is closed.
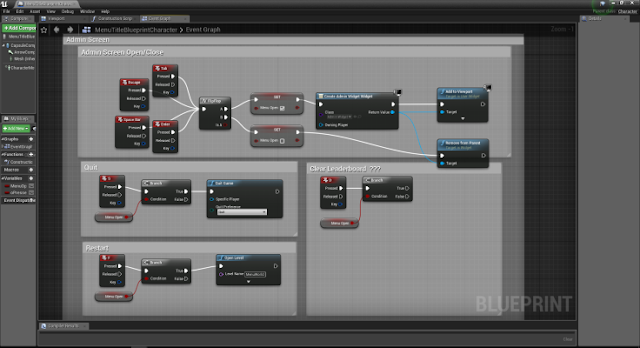
The ‘D’ key’s instruction to delete the leaderboard’s information first requires the leaderboard to be programmed in. This is the task which will not be looked at until later.
Updated User Interface
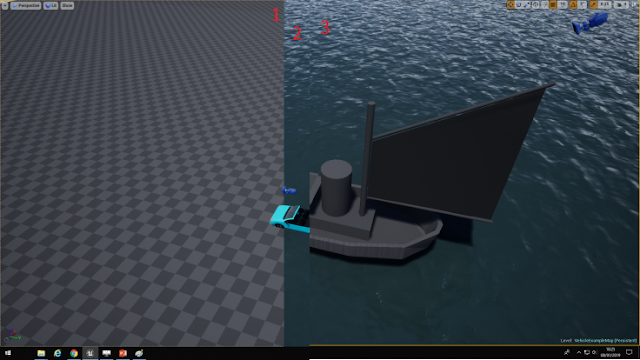
These I then imported into Unreal. The image directly above is a GIF made from inside the Engine. Sam’s boat model was placed onto the water with the addition of “Begin Play > Create Widget > Add to Viewport” in the world blueprint, just to see the effects and how it looked.
With the new user interface created to a design I was happy with (at this current time please note that none of them are yet functional, but are ready to become such once Sam’s boat model and Linards’ boat-movement coding are prepared to be imported).
Game Leaderboard
The leaderboard has always been an important ‘would like to have’ as it would give all players extra motivation to play the game, better their score and be the best player of the game.
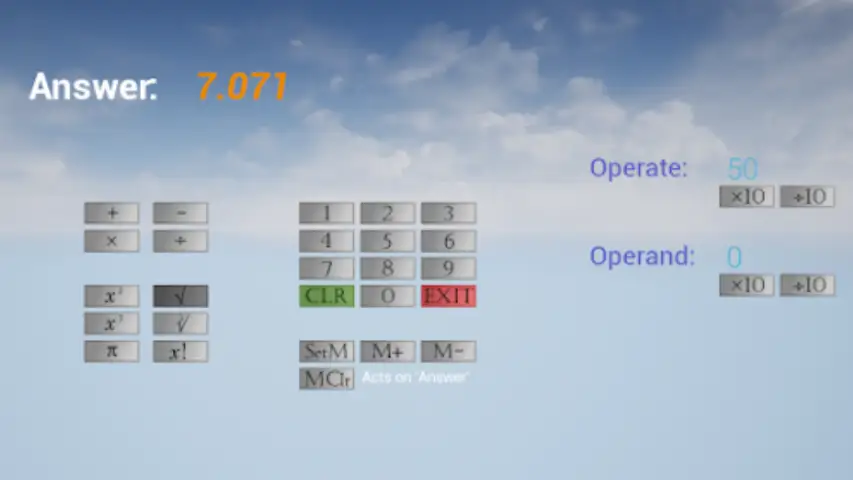
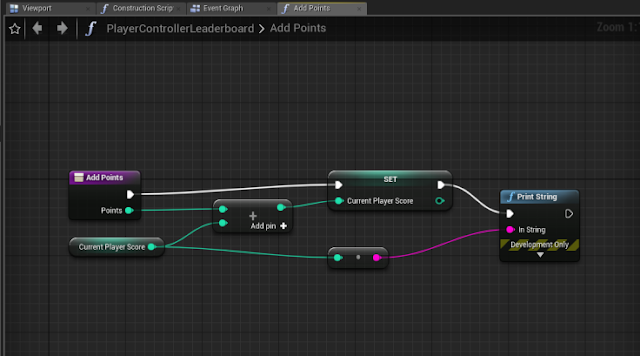
To use the leaderboard, a system of point-collection would first have to be created. This is something which would have to be discussed with the others in the group at a later time for the final product. But for now, I created a ‘Player Controller’ and added an ‘Add Points’ function which was created to SET the ‘Current Player Score’ variable (initially zero) to whatever amount of ‘points’ were to be collected, with a development-only instruction for the game to print the Current Player Score every time it was changed (this became redundant immediately after testing).
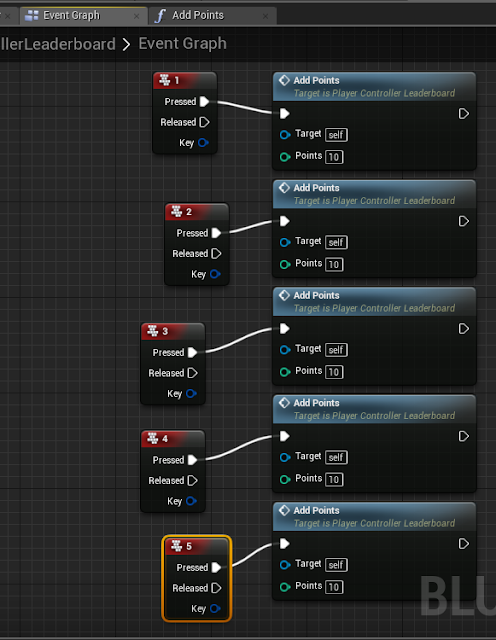
Also under the Player Controller, I then added the ability to press 1 to 5 to add 10 to 50 points to that score, just to test if the mechanic worked.
I then needed to convert the display of the points from being an editor-only display to being able to be viewed in the finished product itself. Ergo, it needed adding to the Game Widget.
Selecting the numbers I had created in the Widget, I ‘Created Binding’ for both of them, making functions in the Widget Blueprint for editing.
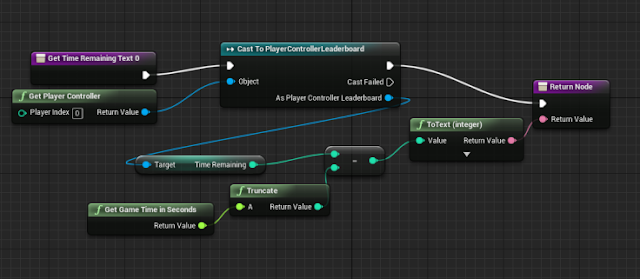
For the top number, demonstrating the time, I first returned to the Player Controller and added a ‘timeRemaining’ variable which was set to 60.
Again casting to the PlayerController, a reference to the ‘timeRemaining’ was made and this value had, subtracted from it, the value of the ‘Current Game Time in Seconds’; this was then added to the Return Node. Thence, the value of 60 would be subtracted by an additional 1 every second, and shown on the HUD.
NOTE for any future ADJUSTMENT: If the amount of time the player is to be given needs changing, ‘Fishing HUD > Delay’ will need to be changed; as will ‘PlayerControllerLeaderboard > Event Graph > Integer A following Game Time and Truncate’.
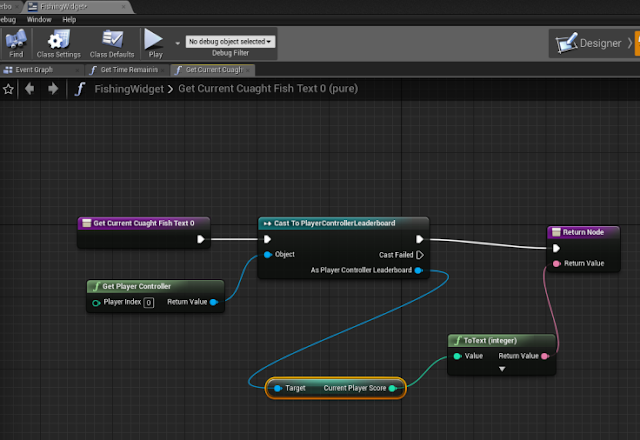
For the lower number showing the amount of fish the player had caught (their score), a ‘Cast To PlayerControllerLeaderboard’ was created, with the object of this being the ‘Player Controller’. This then called a Reference to the ‘Current Player Score’, which was added to the Return Node.
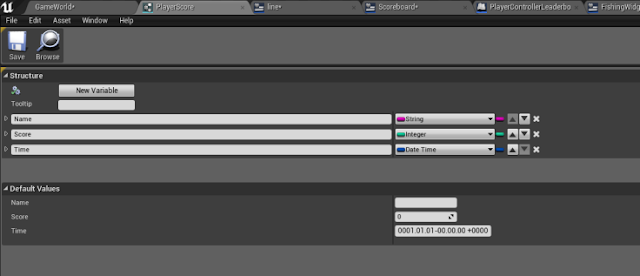
I then had my UI working correctly with the Time and Score of the player. It was then time to create the programming for the leaderboard itself. I then created a PlayerScore Structure and added three new variables: Score (integer), Name (string) and Time (DateTime).
Then was to code the main body of the leaderboard. To start off with, an If Branch was created (which would be checked on every Tick) to see if the ‘Game Time in Seconds’ was less than or equal to 60 (as 60 seconds is the max game time, for now at least). When true, it ‘Once’ destroys the Player Character Actor, before continuing with the rest of the coding. There is currently also a shortcut where E can be pressed to start this, but this is just for testing and will be removed very soon.
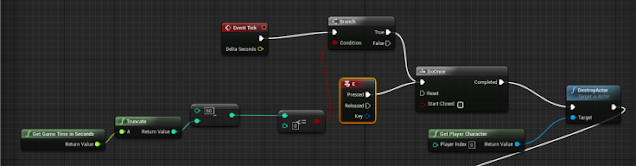
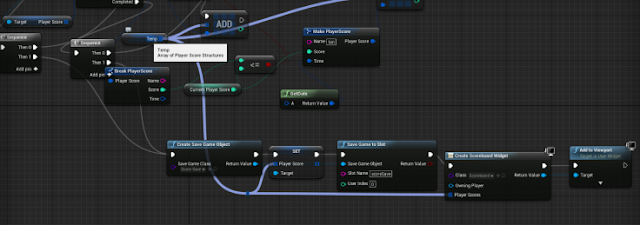
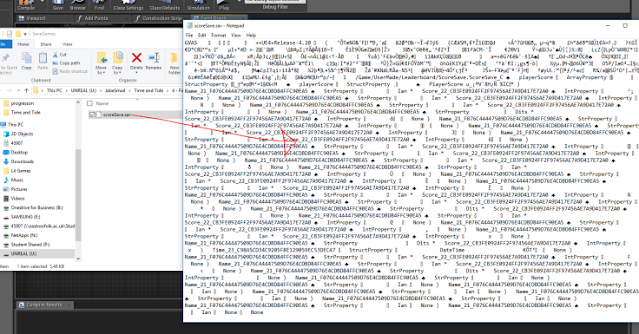
After this, it then loads ‘SaveGame’ Blueprint class that was created in the editor. This SaveGame holds the score information, times and names of everyone who plays the game and saves it into a solid file, which will continue to exist even after the game has been turned off or restarted.
Then, if the loading of the Score Save fails (because there is no score save), it splits using the Sequence and adds the score to the array before creating a Score Save, which it then saves this information to.
From then on, unless it has been cleared/deleted, the ScoreSave load should work. The Player Score is then taken and added to the ‘Temp’ variable, then the Name and Time are referenced and Added to the Score Save also.
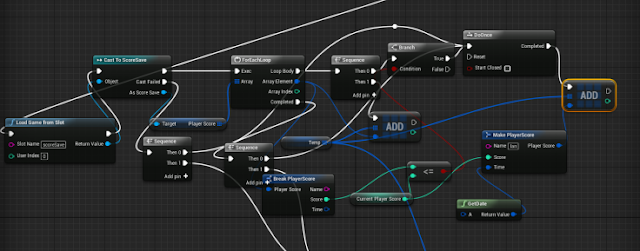
The programming then puts the information in the PlayerScore array, and then saves it to a file which exists outside the program, allowing it to continue to exist through the application being shut down and reopened.
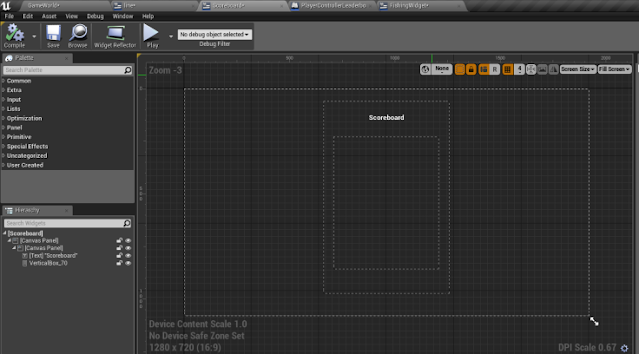
The next step was to create the UI interface. In a new Widget, for the Scoreboard, I inserted a ‘Canvas Panel’, which I placed in the centre of the screen, before adding two further objects into that — a textbox showing ‘Scoreboard’ and a second text box for which I created a Text Bind that casts to the ‘Score Save’ ‘Player Score’.
The ‘Player Score’ comes from the ‘Line’ Widget Blueprint:
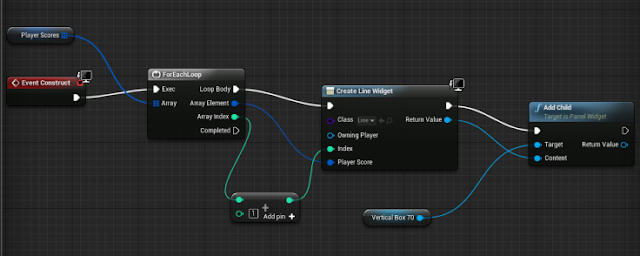
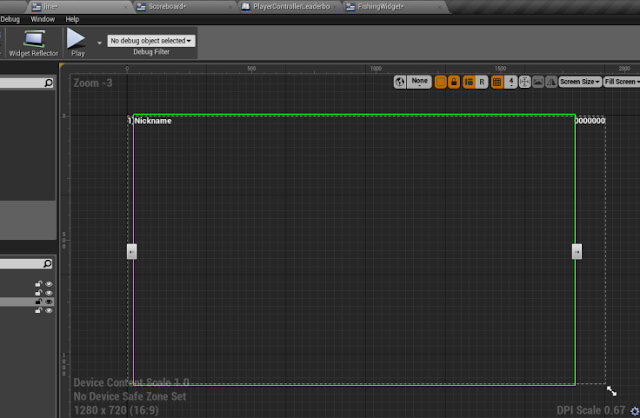
The ‘Line’ Widget Blueprint is what holds the information — the number of the player, their nickname, which will be only three letters long (to avoid obscenities), and their score. The original Canvas was deleted and replaced with a ‘Horizontal Box’. The first textbox was then added and attached to the left, with the second and third then auto-sizing to fill the rest of the space, allowing this Line to completely fill the appropriate box in the Scoreboard.
The three textboxes then had a Binding added — in the form of three ‘SetText’ following the ‘Event Construct’ node. The first was set to display the ‘Number’, the second the ‘Name’ and the third the ‘Score’ of the player — each of these being connected to the ‘Player Score’ variable, which links to the Player Score Structure earlier.

Then, to make the widget appear at the right time, I added, in the ‘Menu HUD’, and ‘FishingGameHUD’, instructions for the Level, on ‘BeginPlay’, to ‘Create Widget’ of the relevant one. The Menu Creates the Fishing Widget, which displays the remaining time and current score of the player, but then, after a Delay of 60 seconds, it is ‘Removed from Parent’ (making it no longer visible) and then Create Widget to make the Name Input screen appear. After the name is put in, the Menu Level then loads, making the Scoreboard and Menu widgets alternate between one another, with a system of delays, ‘Create Widget’ and ‘Remove from Parent’s.
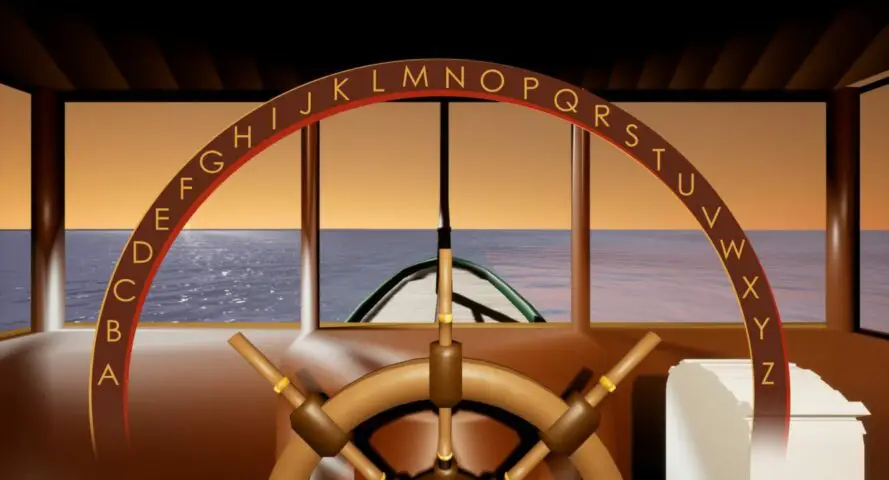
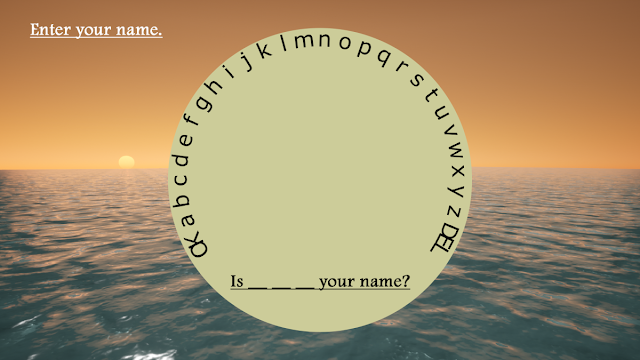
For creating the ability to enter their name, this UI element was added to the Enter Name Widget. ‘Buttons’ were placed to cover each of the letters (these are currently set to be slightly orange so they can be seen, but will be made completely transparent later on), alongside three text boxes large enough for one letter below them.
A ‘ChangeLetterNumber’ variable was created in the Player Controller, alongside an instruction to ‘add one to ChangeLetterNumber’. This was then cast to the three Text Binds the three single-letter text boxes looked to. The three Text Binds all contain an If with the condition that ChangeLetterNumber is equal to either zero, one or two. When the variable equals zero, the first letter is allowed to change; when enter is pressed and one is added, ChangeLetterNumber becomes equal to one, so the If in first Text Bind’s code becomes false, but becomes true in the second one, allowing the second Text Box to be changed by the selected letter.
Whatever Text Box has the ‘True’ If Statement, it then sets the Return Node’ (the text the Text Box displays) to the value of the ‘String’ variable ‘SelectedLetter’.

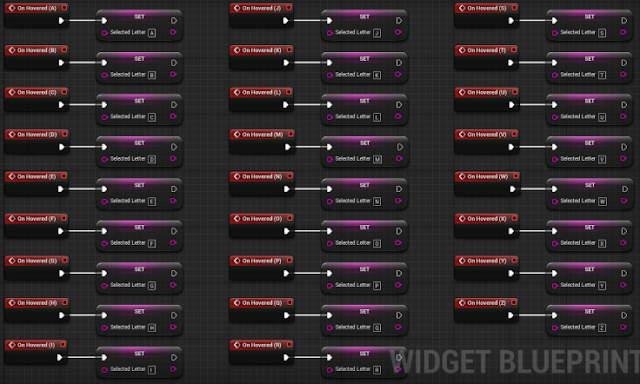
Every single one of the buttons placed above the letters on the UI were then named (from A to Z) and given an ‘OnClicked’ starting node, followed by the instruction to SET the ‘Selected Letter’ variable to whatever letter it was.
However, this proved to be inefficient, as the programming was looking for some kind of input for every single letter change (when selecting a letter) to see it appear on screen. The execution event was therefore changed to ‘OnHovered’, so the displayed letter remained updated with what was being looked at.
With the selection of letters programmed in, it was time to program in the compiling of this information together. Under the Event Graph of the EnterNameWidget, injuncted to fire on every ‘EventTick’, it ‘Prints’ the ‘Appended’ information of the Text of ‘Letter One’, ‘Letter Two’ and ‘Letter Three’. The ‘Cast to PlayerControllerLeaderboard’ was added so a reference could be drawn from the ‘ChangeLetterNumber’ variable, but this will be added later.
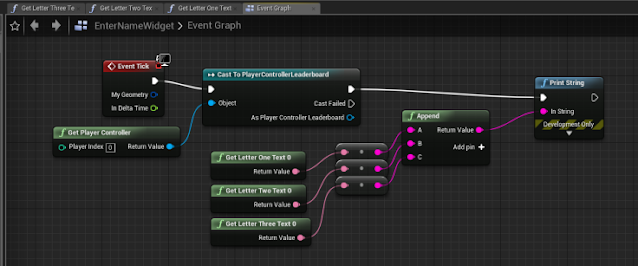
Now, hovering the mouse over the letters starts printing the first letter. When Enter is pressed, it sets that first letter as whatever the mouse was on when it was selected, and the second letter can be selected. The same is true for the third.
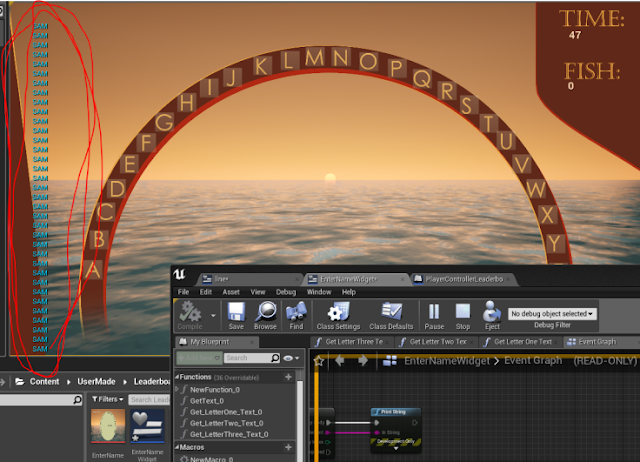
It is an unnecessary waste to have this text being appended on every Tick. Also, while the first, second and third letter display in the centre of the window (as in the Widget), they disappear once they have been selected. These issues — one of inefficiency, the other of UI programming — will have to be fixed.
Assembling and the Name Input/UI
Fixing the issue of the non-displaying text was very simple. In the EnterNameWidget, the three separate Text Boxes were deleted, alongside their ‘Return Node’ coding, and replaced with one single Text Box. Its Text Bind was then set to the value of the new ‘PlayerNameSelected’ string variable, which itself is SET by the Appended ‘Text’ information already explained. The number of letters was increased from three to four, as there are exponentially more four-letter names than three-letter ones. With the new code implemented, the new text would appear on the UI.
However, with regards to the efficiency issue, the plan before was to make it only check once the text had been ‘confirmed’, but now that the Appending of the text was relied upon to make it appear in the UI, having it occur on every EventTick was now necessary.
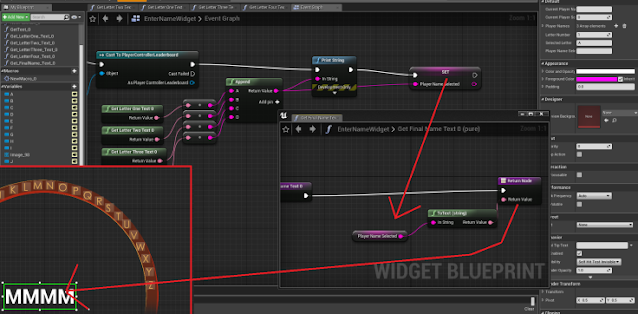
After the PlayerNameSelected was SET, an additional If statement was added, which checked to see if the variable ‘NameIsEntered’ was false.* If it is false, it then SETs the ‘Player Name’ (which is a part of the Leaderboard programming from earlier, under the PlayerControllerLeaderboard) to be the value PlayerNameSelected by the player. The ‘Player Name’ is then used to Make the ‘Player Score’ Array, which is what is saved to the ‘SaveScore’ Savegame.
*boolean variable inside the PlayerControllerLeaderboard — explained shortly.
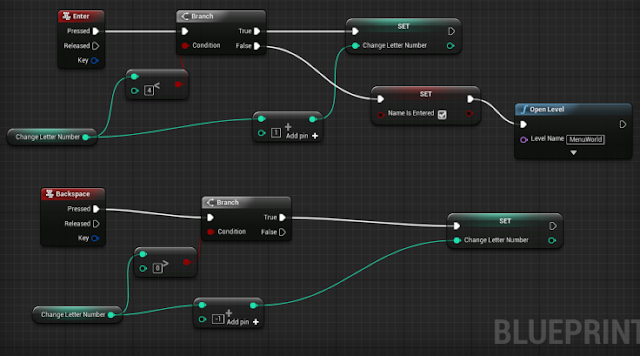
Here is the code which contains the ‘NameIsEntered’ variable. It is located in the PlayerController for the Leaderboard. The ‘ChangeLetterNumber’, as mentioned, is in charge of ensuring that only one letter at a time is being changed in the name input screen. The default value is zero (the first letter). When the player presses Enter, one is added to the ChangeLetterNumber, meaning that the second letter is now being changed. When this value reaches four, however, the If Statement connected to it (is the value less than four) becomes false.
For this to occur, the player must have pressed Enter four times, entering every number, and then an additional ‘Enter’, which ‘Confirms’ to the game that the final ‘NameIsEntered’, SET-ing that variable to ‘True’. It also opens the ‘MenuWorld’ Level, restarting the game in the Menu Screen, which displays the Scoreboard their score is to be held in.
Also, if Backspace is pressed, one is subtracted from the value of ‘ChangeLetterNumber’ (so long as it is not less than zero, the minimum value), allowing the player to go back and change the letters if a mistake was made.
The next important step is to fix the issue in how the information is being transfused across. While the ScoreSave and Scoreboard information does work, it does not, currently, transfer across to the MenuWorld, even though it does talk to the FishingGameWorld.
There were many issues faced in the process of trying to get the scoreboard to work — various systems were tried, using Arrays, SaveStates and so forth; also several ways of storing and sending this information was tried. Progress was made during this time; however, the issue of getting the SaveState to properly save and store the names, and then display them, was an ongoing issue. Eventually, owing to constraints of time, this issue was passed on to our programmer, Linards, to look into; passing the task of creating a ‘Fish AI’ to me.
Something’s Fishy – It’s Fish AI
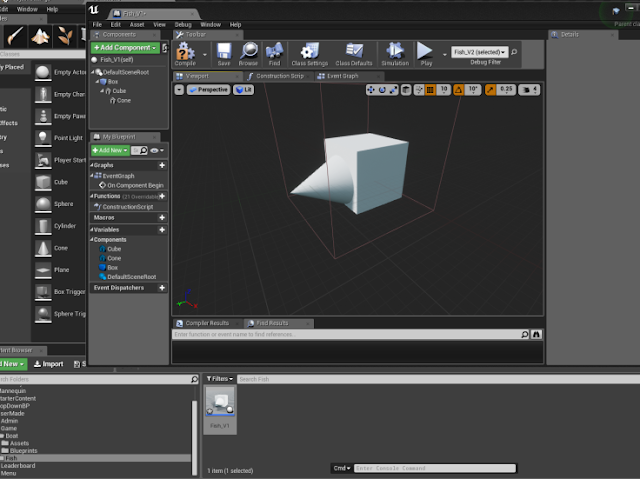
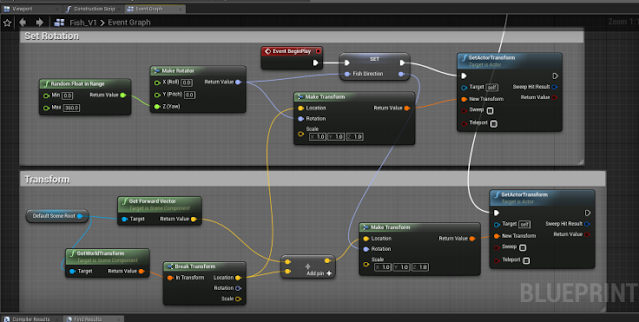
To make a fish AI, I first needed a fish; a new ‘Actor’ Blueprint class (called ‘Fish_V1’). I added a box and a cone, so it would have a physical presence, and a cone so a direction could be seen. A ‘box collision’ was also added. My 3D modeling is also amazing.
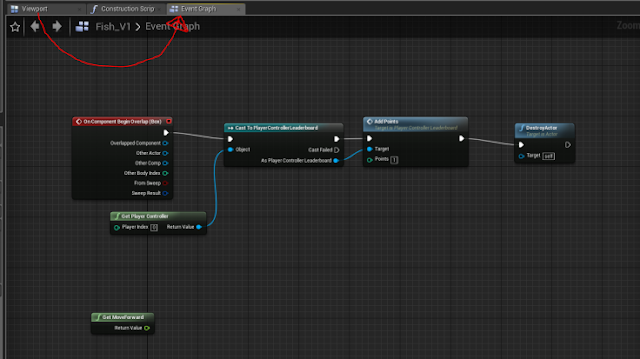
In the Event Graph of the Fish, for the ‘Collision Box’, I created code so that ‘On BeginOverlap’, it would ‘Cast to PlayerControllerLeaderboard’ (which holds the ‘player score’ and other such variables), which then triggers the ‘AddPoints’ function, which exists, also, in the PlayerControllerLeaderboard and SETs the ‘playerScore’ to ‘add’ whatever value is inserted into the ‘Add Points’ in the Fish blueprint. It then ‘DestroysActor’ (itself) so it cannot be picked up more than once.
Now to have the fish spawn and move. My current way of thinking is that there would be an area where fish can be caught, and in that area, there is randomly spawned fish which move around inside that area. The larger area moves in one direction, but the fish inside can move around freely, allowing the fish to have freedom of movement, while still conforming to one direction overall. Both the larger ‘fish spawning’ volume and the fish themselves need random spawning (within a given area) and random direction.
The same code for random movement/direction will work in both the fish and the fish-spawning area. To make the fish move in a given direction, I added an ‘EventTick’ which fired to a ‘SetActorTransform’ node. The ‘New Transform’ given is then made with a ‘MakeTransform’ node, the ‘Location’ of which was a factor of the ‘Current Location’ (as found by the ‘Default Scene Root’s’ ‘GetWorldLocation’, which was then broken down with a ‘Break Transformation’ to get its location).
This was added to the random ‘Vector’ value created by the two ‘RandomFloatInRange’ nodes. The reason there are two is so the X value can have a different value to the Y value. The Z value stays at zero because no upwards or downwards movement is wanted.

This code was then improved upon. Because the idea was that the randomness of the direction was to be attained through random rotation on the Z axis, then it wasn’t necessary to have to worry about having a different direction for Y and X, or even Y at all, because it just needed to move forwards, while the random rotation dealt with the rest. Thereto, the two ‘RandomFloatInRange’ nodes were deleted, and the X value was set to 1.
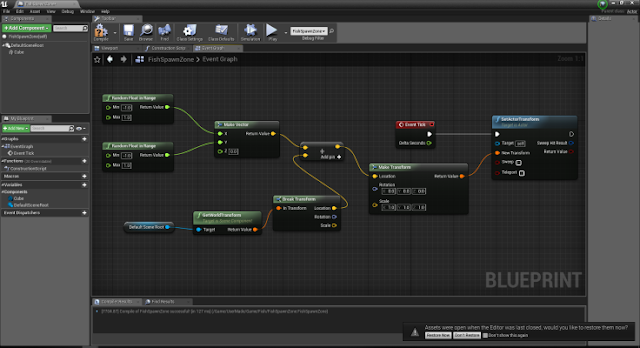
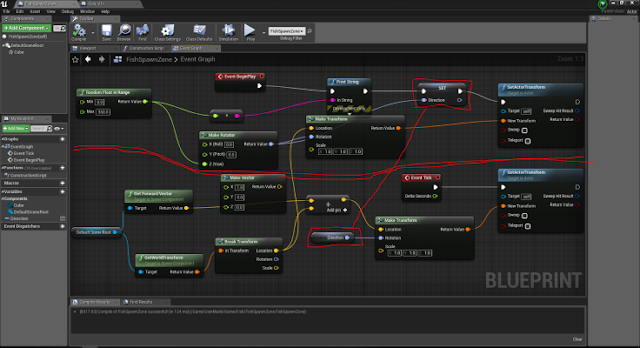
Then was added the random rotation. The rotation is to be set only at the start of the project (its BeginPlay). On its ‘BeginPlay’, as above, it then SetsActorTransform, with the New Transform being given set by its ‘CurrentLocation’ (which is taken from the movement side of the code), added to a random value between 0 and 360. This then SETs the Direction, which is used in the EventTick of the prior ‘SetActorTransform’.
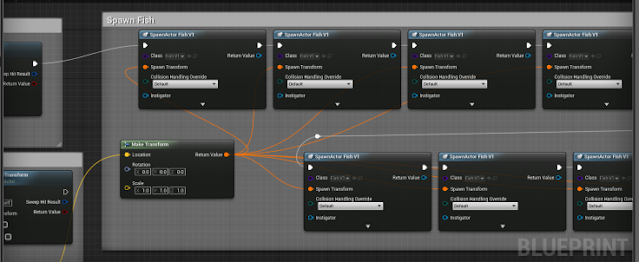
The ‘BeginPlay’ in the FishSpawnZone blueprint also follows to a series of ‘SpawnActor’ nodes, with the actor of these set to the ‘Fish’, which is to be spawned, and the location of it following from the ‘BreakTransform > location’ of the ‘Transform’ code.
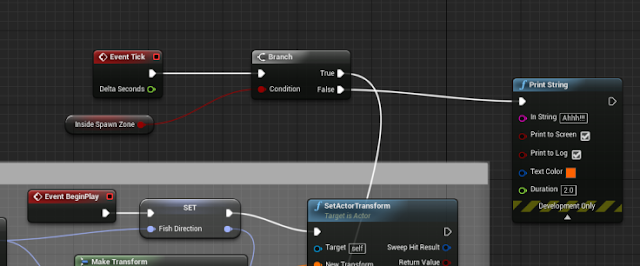
This is that same programming tidied up and put into ‘comment’ boxes (created by selecting the nodes and pressing ‘C’). This is, in fact, the random-rotation and transformation code for the Fish, which is the same as it is for the FishSpawnVolume. The execution event for the SetActorTransform in the ‘Transform’ box is still an ‘EventTick’; however, the EventTick is above the code, because it is now being used to test a variable.
Because the idea of these ‘Fish’ boxes within a ‘FishSpawn’ box is to allow the fish individual free movement, while still conforming to an overall trend of movement, it is necessary they act differently when they are ‘inside’ or ‘outside’ the FishSpawn box. Thereto, an ‘insideSpawnZone’ boolean variable was created, with an If statement branching from the EventTick. If ‘insideSpawnZone’ is true, the code continues with the SetActorTransformation code above. If it is false… well, this will be looked at shortly.
To set the ‘insideSpawnZone’ variable, a box collision was created in the FishSpawnVolume. The ‘insideSpawnZone’ variable is initially set to be ‘True’. On an ObjectEndOverlap with the spawn area, it then Casts to the Fish and then SETs it to false — and vice versa for BeginOverlap (which is, supposedly, triggered when the fish turns around and re-enters the ‘shoal’.

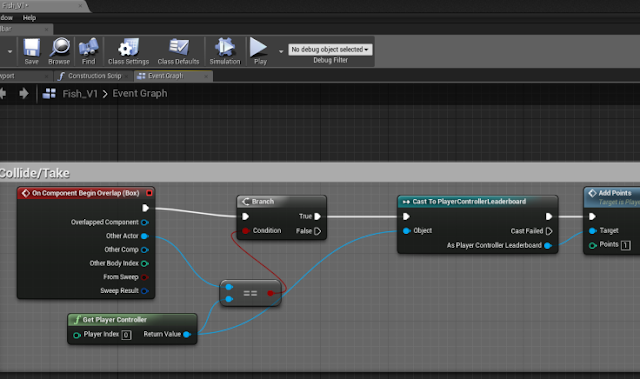
The main issue currently standing is that, because the Fish are programmed to ‘DestroyActor’ and ‘AddScore’ upon ‘BeginCollision’ (so the player can pick them up), they are instantly destroyed, because they are ‘colliding’ with the box collision, which is necessary to tell them if they are inside or outside the FishSpawnZone. It works perfectly if Unreal is told to “Simulate” the game and the fish spawn and move; if it is “Played”; however, they are instantly created and destroyed by the SpawnZone.
To solve this, a simple piece of code was added to the ‘Collide/Take’ code of the ‘Fish’ (the piece of code which was causing the fish to be destroyed upon overlap with the BoxCollision of the FishSpawnZone (which was instant)). A conditional ‘IF’ Branch was added, with the condition being if the “Other Actor,” in terms of what the Overlap Component is, ‘equal’ (==) to the ‘PlayerController’. In other words, if the ‘Other Actor’ colliding with the Fish is ‘Not’ the ‘PlayerController’, no action will occur, meaning it will be destroyed only when the player collides with it.
All that now remains for the fish is to program their return back into the FishSpawnZone upon their exit of it, and the random spawning of FishSpawnZones
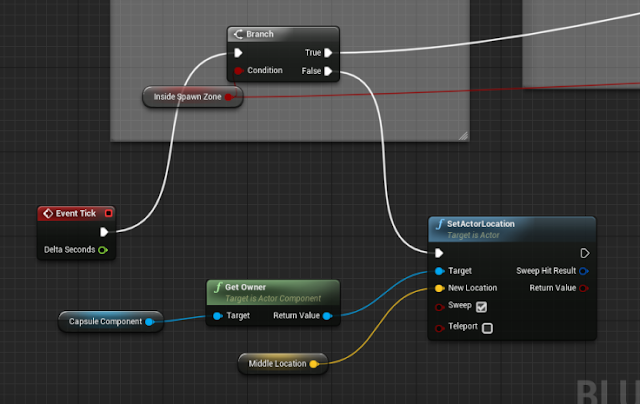
The Spawning of these FishSpawnZones can be done quite easily with the same code the SpawnZones used to spawn Fish. A ‘MotherSpawner’ blueprint was created, with instruction to, on BeginPlay, spawn the FishSpawnZones. The code to get the fish to return inside the FishSpawnZone, they appeared in, was complicated. I attempted creating a ‘CenterPoint’ vector variable, which cast to the FishSpawnZone, and was updated on EventTick to be equal to the centre of the FishSpawnZone. The instruction was then given to the fish to, if “insideSpawnZone” was ‘false’ to “SetActorLocation” to the ‘CenterPoint’ set.
However, due to issues in getting the fish to properly register, these issues were handed from me, again, to our programmer. The issue laid in the fact that all of the spawned fish were copies of one another, and that all the SpawnZones were of the same instance. After looking through it, the instruction of using the “Child Blueprint” (and creating a child class of the fish) was used to help the program identify and move the fish to the correct points.
There are also a few other issues — arising from the issue that I’ve never been properly taught programming extensively in Unreal and have just had to learn what I can without a proper understanding of how information moves around the elements in the game engine, how they talk and so forth. Thereto, the issue has been given to Linards, who does understand all these elements and knows better what the engine can offer in terms of programming, while I returned to polishing the User Interface elements.
Polishing the UI
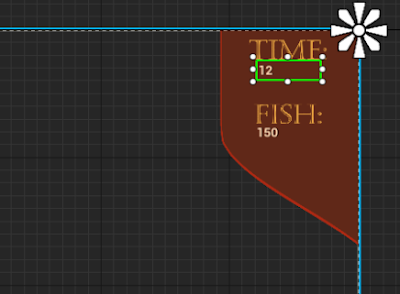
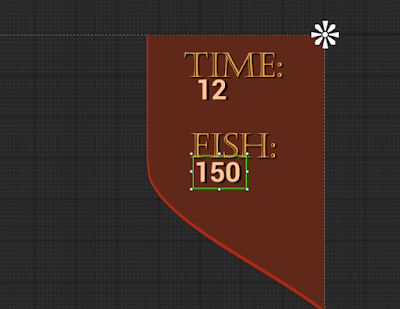
This is just a brief overview of the final changes to the UI since last time. Here is the main game UI, showing the time remaining and the fish caught.
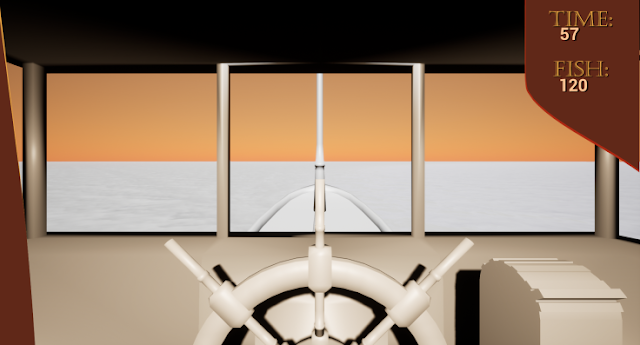
The size of the numbers had been increased and the letters had been given a drop shadow in GIMP.
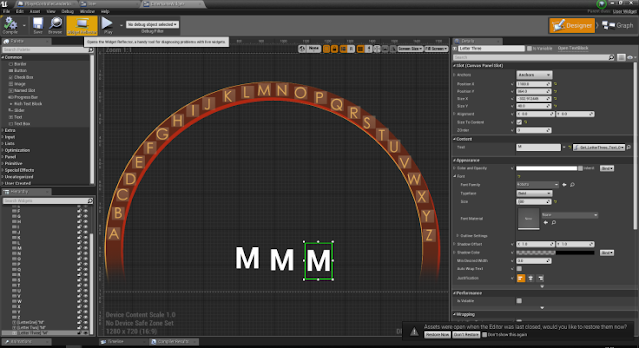
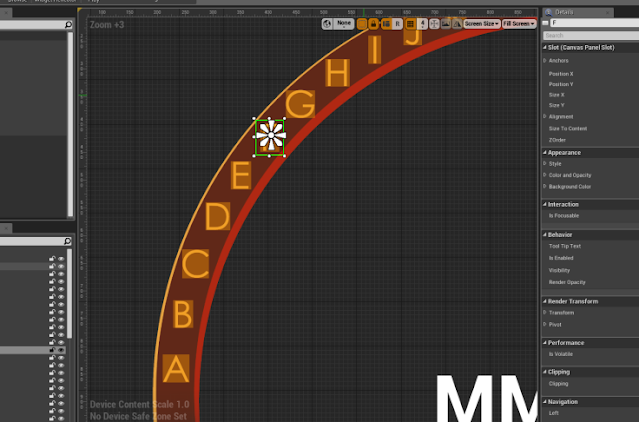
Here is the name input screen. Quite some time was taken trying to get the letters to align as close to being equally spaced from one another, as it was possible to do, without spending an unnecessary amount of time, and in accordance with the law of diminishing returns.
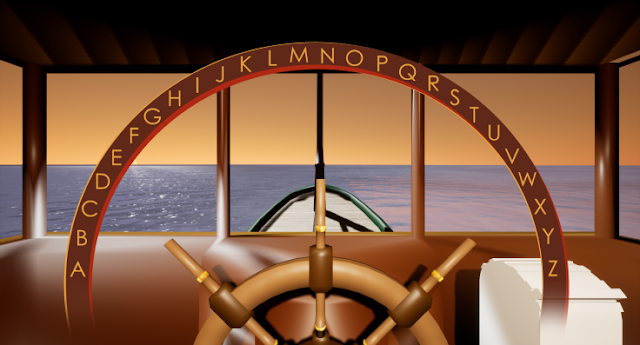
Every letter had a button as before, carefully aligned over the top, with an ‘image cover’ which displayed only when hovered over to show which letter was selected. A few of these overlapped the inner and outer border, as the G did in this example — however, it wasn’t noticeable enough, once they were full screen together, to be worth being taken apart in GIMP and remade.
Here is the finalized leaderboard. The score and name input has been corrected and put together into a saveState by Linards, and set to show the first twenty scores. The new boat which Sam has modeled and textured has been put on the right.
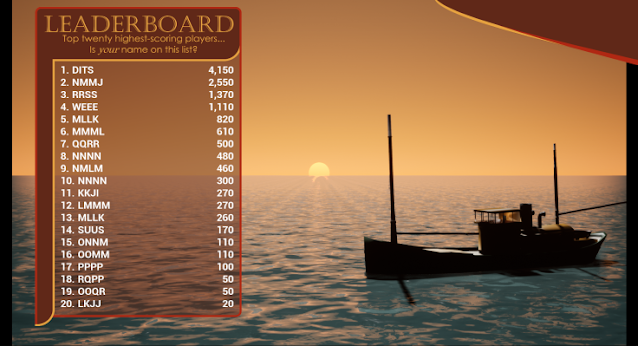
The text box, containing the information to draw text from the ‘Line’, is still in the code, now relocated to be in the correct position to display the pertinent information. The players’ names and their score could do with being brought closer together, but this will be done easily enough in the code.

Here is the title screen, which would display when the game is started, switching between that and the leaderboard.
It has had only slight changes from last time, and remains in its own Widget Blueprint as before.
Aside from a few very small changes to the positions and colours of small parts of the User Interface, and the potential for certain phrases (such as the information on how to look for and find the fish) to change at a later date, the UI of the game was now completed.
Adding to the Boat Interior
The ship’s wheel was now reversed in its direction, allowing the direction of the turning to move the object in the correct direction, with the front visible to the player.
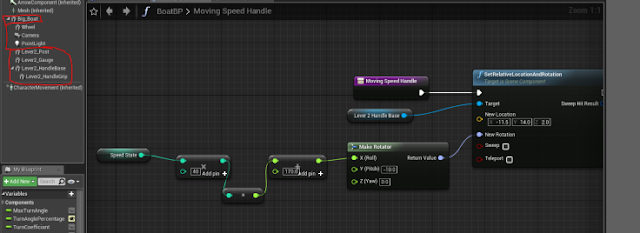
The speed control stick made by Sam was imported into the project in separate parts. The base, main body and lever were positioned into their correct locations and added to being children of the ‘Big_Boat’. The movement of the handle, programming it to go forwards and backwards, had already been previously made using an array of locations.
For transferal to Sam’s model, however, this system was deleted and replaced with a system which used only the “currentSpeed” variable (1 to 4) Linards had made earlier, multiplying this value by the correct amount and adding additional rotational values — alongside finding the exact world location required to make it spawn in the correct location — were added to the ‘SetRelativeLocationAndRotation’ of the Lever (the handle and lever body are two separate components, but the handle has been made a child of the main lever base).
Final changes
A few small changes were made late in development. Some redundant code was removed, assets which were not used in the final product of the game were deleted from UE4’s asset library and, some changes were made to the steering system and the relation between the in-game and real-life wheel (though the system is still buggy). Most notably, the fish were simplified to spawn at a random location in a large collection and move about randomly on the Z-plane.
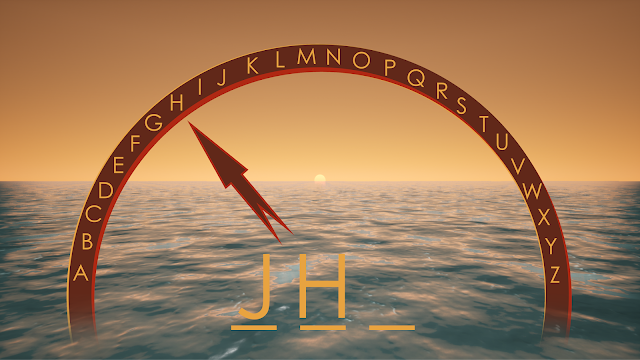
This stripped away all the coding of having a ‘collection’ of fish moving as a shoal, since they de-spawned after a short time anyway, meaning they mostly stayed together without special coding to keep them together. An arrow was added which points to the collection of fish, so the player could easily see where the fish were, and the ‘splashing’ partial effect was replaced with a 3D modeling resembling a sign post, pointing down to where each individual fish was.
This removed the lag problem of having many splashing partical effects on screen at the same time, made it easier to see where fish were (and how many you were collecting) and made it more satisfying to play, since you had clear feedback whenever you’d pick a fish up.